For actually about 8 years, I've been quietly working with WWARA, the frequency coordinator for the Western Washington region, to correct inconsistencies in their coordination database. A coordination database is a source of truth for radio repeaters you can reach in your region. Technically coordination is voluntary, but the FCC rules say that if there's a conflict (two repeaters interfering with each other) the coordinated repeater has the right of way.
I got into this because I hate manually configuring radios. It's so tedious, even using the PC software that goes with your radio. So I wrote scripts that convert the data from WWARA into formats that can be imported through your PC software. In fact, the .chirp
format file that's included in WWARA database extracts is generated by a script I wrote (unfortunately CHIRP deprecated that format). I've had scripts to convert to Icom format, various iterations of OpenGD77, and others.
Along the way I've made my scripts easier for me to use and adapt to new formats, and to check for more errors, including where a coordination doesn't align with the Band Plan. It's all in a fairly robust state now. You can check it out at github.com/ajorg/WWARA, but the reason I wanted to blog about it is that we've reached an important milestone: The WWARA coordination database contains no detectable errors. Actually there are just two records that violate some rule or other, but these are grandfathered in. One of them is quite old.
That doesn't mean it accurately reflects what repeaters are on the air in the Western Washington region, but it does mean that every coordination conforms to the rules, and most are probably accurate.
I've even got an AWS Lambda Function that notifies me by Webhook when there are changes to the database, detailing what's been changed or added, and any new errors.
I've also played with automating submissions to RepeaterBook. There are 25 repeaters known to WWARA that don't have any likely matches there, but there are no APIs for submitting new entries, so that's a dead end for me.
]]>Like almost any Linux distribution that has a container image available, you can run Amazon Linux 2023 on the Windows Subsystem for Linux. This guide assumes you've installed and configured WSL2 and already have something like Debian running under it.
AL2023 container images can be downloaded from: https://cdn.amazonlinux.com/al2023/os-images/latest/container/
WSL will be able to import the .tar.xz
file directly.
From PowerShell or Command Line, import the image into WSL (you may want to choose a different InstallLocation
than I have here):
wsl --import AL2023 C:\WSL\AL2023 Downloads\al2023-container-<version>-x86_64.tar.xz
Assuming that succeeded you can log in (as root):
wsl --distribution AL2023
Processing fstab with mount -a failed.
[root@Lenovo-M90n andrew]# cat /etc/os-release
NAME="Amazon Linux"
VERSION="2023"
ID="amzn"
ID_LIKE="fedora"
VERSION_ID="2023"
PLATFORM_ID="platform:al2023"
PRETTY_NAME="Amazon Linux 2023"
ANSI_COLOR="0;33"
CPE_NAME="cpe:2.3:o:amazon:amazon_linux:2023"
HOME_URL="https://aws.amazon.com/linux/"
BUG_REPORT_URL="https://github.com/amazonlinux/amazon-linux-2023"
SUPPORT_END="2028-03-15"
Now even though we used the container
image and not container-minimal
, a lot of the things you'd find in an AL2023 AMI are missing. That's why Processing fstab with mount -a failed.
It's meant to be a container runtime image, not a user-interactive image, so this is normally fine.
dnf -y install util-linux passwd sudo
That will get you mount
, useradd
, passwd
and sudo
, which are all you need for the remaining steps. sudo
recommends system-default-editor
which will default to nano
. I'm old enough to prefer vim
, and if you add vim-default-editor
to the dnf install
command it will skip nano
.
If you want an unprivileged user, you'll need to add one and set a password (the --groups wheel
option makes it so this user can use sudo
):
useradd \
--create-home \
--user-group --groups wheel \
--comment User \
user
passwd user
To configure WSL to use that user by default, you also need to create an /etc/wsl.conf
file with the following content:
[user]
default = user
Log out, terminate the VM, and start it again. This time you should be logged in as the user you created earlier:
wsl --terminate AL2023
# Wait 8 seconds?
wsl --distribution AL2023
To get it to show up under Windows Terminal you might need to stop WSL or reboot:
wsl --shutdown
I've also needed to delete the state.json
file from %LOCALAPPDATA%\Packages\Microsoft.WindowsTerminal_8wekyb3d8bbwe\LocalState\
to get the icon shortcuts for the Windows Terminal to update, but that's probably a bug.
If you've got WSLg installed you can even install a GUI application and run it from AL2023. Since it doesn't have many GUI applications, you could install and run one from Flathub:
sudo dnf -y install flatpak
flatpak install -y --user --from https://dl.flathub.org/repo/appstream/org.gnome.TwentyFortyEight.flatpakref
flatpak run --user org.gnome.TwentyFortyEight
]]>Preheat oven to 375°F
1 Paper bag, large
9" Pie shell, unbaked
5 cups Apples, peeled and sliced
6 ounces Butterscotch morsels
Cinnamon
¼ cup Flour (all purpose)
¼ cup Sugar
1 tsp Salt
½ cup Cream (light)
Combine apples and butterscotch morsels; put into pastry shell and sprinkle generously with cinnamon.
Combine flour, sugar, and salt; then add cream. Drizzle over apples so that slices are coated.
Place pie in large paper bag; fasten bag securely. Bake in moderate oven at 375°F for about 70 minutes.
Remove from bag at once and let cool.
]]>Update: I cut the beef base in half (it was too salty).
Buy some fries at Five Guys. Large regular fries. Making your own fries is hard, so don't. If you can get someone to fetch them while you make the gravy it's best if they're fresh.
I like Ellsworth Natural Cheese Curds. I buy them from Amazon Fresh, but cheese is regional. Fresh natural curds are best, no colors or flavors.
Leave them out on the counter while you make the gravy so they aren't cold. I've seen poutineries keep them in tepid water, but of course you should drain them first if you do that. Wet cheese would mean wet fries.
I make my gravy with Orrington Farms Beef Base that I also buy from Amazon. Many beef bases and bouillons use soy protein, which I'm allergic to, but this one is good. No need for other seasonings.
4 Tbsp Corn starch
1 Tbsp Beef base
2 cups cold Water
1 Tbsp Cream
Whisk together corn starch, beef base, and cold water in a sauce pan. Bring just to a boil over medium heat, whisking constantly. Add cream and continue to whisk while gravy comes back to near boil. Remove from heat.
Corn starch needs to be mixed while cold to avoid clumping, and thickens around boiling temperature.
If you've never had poutine I guess this deserves some explanation. Combine fries and cheese curds, maybe two parts fries and one part cheese? To taste really. Pour some hot gravy over the fries (don't drown them) and enjoy, probably with a fork.
]]>2 cups dry Bread cubes (4-5 slices)
4 cups scalded Milk
¾ cup Sugar
1 Tbsp Butter
¼ tsp Salt
4 slighly beaten Eggs
1 tsp Vanilla
Oven 350°
Soak bread in milk 5 min. Add sugar, salt, and butter. Add eggs, vanilla and mix well.
Pour into greased 1½ quart baking dish. Bake in pan of hot water (I use hot tap water and put pan in oven while oven is heating) until Knife comes out clean. About 1 hour. Use caution when removing from oven—water is hot, pan is not stable, it is heavier than anticipated.
Have fun!
]]>Admittedly that's a pretty niche thing. There are a total of, like, three well known services that make use of the standard and a handful of others. Then again, this kind of standard is what makes a vendor neutral, decentralized web possible. Publishers can use whatever Hub they prefer, and can migrate subscriptions to another hub when they want.
I stumbled across WebSub around the time AWS Lambda launched their new Function URLs feature, and I was itching to build something that used them, so I built a Subscriber.
WebSubscriber uses AWS Lambda, Function URLs, and DynamoDB to subscribe to web content, and delivers published content to Amazon SNS. In other words, it bridges the WebSub pub/sub system to the SNS pub/sub system. It's written in pure Python, using only the standard library and Boto3 (the AWS SDK for Python), and released under the MIT License. It passes all Subscriber tests in the WebSub Rocks! test suite. Just a hobby, won't be big and professional, but it was fun to write and combined with my SNS to Webhook Lambda Function I can be notified of updates to... my own blog. Yay!
]]>1st bowl (dry ingredients):
1 pound Flour (all purpose)
3 Tbsp Baking powder
½ Tbsp (1½ tsp) Salt
Whisk together.
2nd, larger bowl (wet ingredients):
3 Eggs (large)
⅔ cup Sugar
⅔ cup oil (corn is best)
Beat together, then add the following.
3 cups Milk
½ Tbsp (1½ tsp) Vanilla
Beat together. Add dry ingredients to wet and quickly beat all together until just smooth. Let stand several minutes while heating griddle to just under 350°F (above medium on a stove, probably).
Cook the first side until bubbles begin to pop on the top, and edges lose their shine. When they're less liquid you can peak to see if the bottom is golden brown yet. Flip.
Cook the second side until the first side (now the top) starts to soften again. Test by gently swiping the middle of the pancake not long after flipping so that you know what it feels like to start, then periodically to check if escaping steam has softened it. Again, you can lift the pancake to peak at the color.
Done correctly this dirties a minimum number of bowls and other tools. Use your hand mixer on low to whisk the dry ingredients and avoid dirtying a whisk. If your second bowl is a measuring bowl, you can avoid dirtying a measuring cup. If you don't have a half tablespoon, use 3 half teaspoons.
I was taught to barely mix the final batter, leaving it lumpy. I suppose this was to avoid creating too much gluten, but a wet batter won't become bready as long as it's not being mixed after it's thickened. Mixing after the batter thickens will also cause it to fall, so don't.
I prefer a clean non-stick griddle, but a buttered griddle or pan is fine.
The recipe is descended from the Grandma King's Hotcakes recipe found in my own Grandma Jorgensen's copy of a Salina, Utah ward cookbook. The ingredients are essentially as in Grandma King's but the procedure is improved.
]]>Until AL2022 is available at https://cdn.amazonlinux.com/os-images/latest/ (or more likely https://cdn.amazonlinux.com/os-images/2022/) we'll be pulling it from Amazon ECR Public. When it is on the CDN you won't need another Linux and can instead download the archive directly.
I found it convenient to use Skopeo (sudo apt install skopeo
) rather than setup Docker.
This downloads the latest 2022 image from ECR to al2022/
:
skopeo copy docker://public.ecr.aws/amazonlinux/amazonlinux:2022 dir:al2022
Notice the blob hash in the output:
Getting image source signatures
Copying blob 3cef325a7204 done
Copying config 353840340a done
Writing manifest to image destination
Storing signatures
Copy the blob out to somewhere Windows can see it (note that the hash changes when the image is updated):
cp al2022/3cef325a7204* /mnt/c/amazonlinux-2022.tar.gz
From PowerShell or Command Line, import the image into WSL (you may want to choose a different InstallLocation
than I have here):
wsl --import AL2022 'C:\WSL\AL2022' 'C:\amazonlinux-2022.tar.gz'
Assuming that succeeded you can log in (as root):
wsl --distribution AL2022
If you want an unprivileged user instead, you'll need to add one and set a password (the --groups wheel
option makes it so this user can use sudo
):
useradd --comment User --create-home --user-group --groups wheel user
passwd user
To configure WSL to use that user by default, you also need to create an /etc/wsl.conf
file with the following content:
[user]
default = user
Log out, terminate the VM, and start it again. This time you should be logged in as the user you created earlier:
wsl --terminate AL2022
wsl --distribution AL2022
To get it to show up under Windows Terminal you might need to stop WSL or reboot:
wsl --shutdown
If you've got WSLg installed you can even install a GUI application and run it from AL2022. Since it doesn't have many GUI applications yet, you could install and run one using flatpak
:
sudo dnf install flatpak
flatpak install --user --from https://dl.flathub.org/repo/appstream/org.gnome.TwentyFortyEight.flatpakref
flatpak run --user org.gnome.TwentyFortyEight
Melt butter on low. Mix salt and spices into melting butter. Don’t let butter burn while measuring spices.
Whisk flour into butter mixture. Cook, whisking occasionally, until browned. Mixture will become bubbly and will brown faster on the bottom, so whisking is important to prevent burning.
Add milk, 1 cup at a time, whisking each time until smooth. Raise heat to medium. Add cheese 1 cup at a time, whisking each time until smooth. It’s important to not not let it get too hot during this stage.
Start adding water when adding cheese has thickened the sauce enough that it’s difficult to stir. Be careful not to splash. Continue adding water until it’s just thinner than you’d like. Sauce will thicken as it cools.
]]>--queryformat
or --qf
) is extremely useful for gathering detailed information about a system, but the documentation is lacking. I needed to look at what key was used to sign packages, but the SIGPGP
query tag is printed as a huge hexadecimal number by default. It turns out there's a way to get it to format in a more useful way, using formatting names. Formatting options are mentioned in the documentation, and some examples, but there's no list of what formatting names are available outside the source code.
From lib/formats.c
// Copyright (c) 1998 by Red Hat Software, Inc.
// SPDX-License-Identifier: LGPL-2.0-only
static const struct headerFormatFunc_s rpmHeaderFormats[] = {
{ RPMTD_FORMAT_STRING, "string", stringFormat },
{ RPMTD_FORMAT_ARMOR, "armor", armorFormat },
{ RPMTD_FORMAT_BASE64, "base64", base64Format },
{ RPMTD_FORMAT_PGPSIG, "pgpsig", pgpsigFormat },
{ RPMTD_FORMAT_DEPFLAGS, "depflags", depflagsFormat },
{ RPMTD_FORMAT_DEPTYPE, "deptype", deptypeFormat },
{ RPMTD_FORMAT_FFLAGS, "fflags", fflagsFormat },
{ RPMTD_FORMAT_PERMS, "perms", permsFormat },
{ RPMTD_FORMAT_PERMS, "permissions", permsFormat },
{ RPMTD_FORMAT_TRIGGERTYPE, "triggertype", triggertypeFormat },
{ RPMTD_FORMAT_XML, "xml", xmlFormat },
{ RPMTD_FORMAT_OCTAL, "octal", octalFormat },
{ RPMTD_FORMAT_HEX, "hex", hexFormat },
{ RPMTD_FORMAT_DATE, "date", dateFormat },
{ RPMTD_FORMAT_DAY, "day", dayFormat },
{ RPMTD_FORMAT_SHESCAPE, "shescape", shescapeFormat },
{ RPMTD_FORMAT_ARRAYSIZE, "arraysize", arraysizeFormat },
{ RPMTD_FORMAT_FSTATE, "fstate", fstateFormat },
{ RPMTD_FORMAT_VFLAGS, "vflags", vflagsFormat },
{ RPMTD_FORMAT_EXPAND, "expand", expandFormat },
{ RPMTD_FORMAT_FSTATUS, "fstatus", fstatusFormat },
{ -1, NULL, NULL }
};
So how do you use this? Where you've got %{SIGPGP}
in your query format string, use %{SIGPGP:pgpsig}
instead. You'll notice that there's even a handy shescape
formatting name to make your output shell-safe, and a date
name for formatting dates. The expand
formatting name calls the rpmExpand()
function, which could be handy for something.
If your goal is to discover which of your accepted public keys a package was signed with, you want to match the Version
portion of the gpg-pubkey
to the last 8 hex digits of the formatted signature on the package.
[root@penguin /]# rpm -qi gpg-pubkey
Name : gpg-pubkey
Version : 9570ff31
Release : 5e3006fb
Architecture: (none)
Install Date: Sat Mar 6 19:58:35 2021
Group : Public Keys
Size : 0
License : pubkey
Signature : (none)
Source RPM : (none)
Build Date : Tue Jan 28 10:03:39 2020
Build Host : localhost
Packager : Fedora (33) <fedora-33-primary@fedoraproject.org>
Summary : Fedora (33) <fedora-33-primary@fedoraproject.org> public key
Description :
-----BEGIN PGP PUBLIC KEY BLOCK-----
Version: rpm-4.16.0 (NSS-3)
mQINBF4wBvsBEADQmcGbVUbDRUoXADReRmOOEMeydHghtKC9uRs9YNpGYZIB+bie
bGYZmflQayfh/wEpO2W/IZfGpHPL42V7SbyvqMjwNls/fnXsCtf4LRofNK8Qd9fN
kYargc9R7BEz/mwXKMiRQVx+DzkmqGWy2gq4iD0/mCyf5FdJCE40fOWoIGJXaOI1
Tz1vWqKwLS5T0dfmi9U4Tp/XsKOZGvN8oi5h0KmqFk7LEZr1MXarhi2Va86sgxsF
QcZEKfu5tgD0r00vXzikoSjn3qA5JW5FW07F1pGP4bF5f9J3CZbQyOjTSWMmmfTm
2d2BURWzaDiJN9twY2yjzkoOMuPdXXvovg7KxLcQerKT+FbKbq8DySJX2rnOA77k
UG4c9BGf/L1uBkAT8dpHLk6Uf5BfmypxUkydSWT1xfTDnw1MqxO0MsLlAHOR3J7c
oW9kLcOLuCQn1hBEwfZv7VSWBkGXSmKfp0LLIxAFgRtv+Dh+rcMMRdJgKr1V3FU+
rZ1+ZAfYiBpQJFPjv70vx+rGEgS801D3PJxBZUEy4Ic4ZYaKNhK9x9PRQuWcIBuW
6eTe/6lKWZeyxCumLLdiS75mF2oTcBaWeoc3QxrPRV15eDKeYJMbhnUai/7lSrhs
EWCkKR1RivgF4slYmtNE5ZPGZ/d61zjwn2xi4xNJVs8q9WRPMpHp0vCyMwARAQAB
tDFGZWRvcmEgKDMzKSA8ZmVkb3JhLTMzLXByaW1hcnlAZmVkb3JhcHJvamVjdC5v
cmc+iQI4BBMBAgAiBQJeMAb7AhsPBgsJCAcDAgYVCAIJCgsEFgIDAQIeAQIXgAAK
CRBJ/XdJlXD/MZm2D/9kriL43vd3+0DNMeA82n2v9mSR2PQqKny39xNlYPyy/1yZ
P/KXoa4NYSCA971LSd7lv4n/h5bEKgGHxZfttfOzOnWMVSSTfjRyM/df/NNzTUEV
7ORA5GW18g8PEtS7uRxVBf3cLvWu5q+8jmqES5HqTAdGVcuIFQeBXFN8Gy1Jinuz
AH8rJSdkUeZ0cehWbERq80BWM9dhad5dW+/+Gv0foFBvP15viwhWqajr8V0B8es+
2/tHI0k86FAujV5i0rrXl5UOoLilO57QQNDZH/qW9GsHwVI+2yecLstpUNLq+EZC
GqTZCYoxYRpl0gAMbDLztSL/8Bc0tJrCRG3tavJotFYlgUK60XnXlQzRkh9rgsfT
EXbQifWdQMMogzjCJr0hzJ+V1d0iozdUxB2ZEgTjukOvatkB77DY1FPZRkSFIQs+
fdcjazDIBLIxwJu5QwvTNW8lOLnJ46g4sf1WJoUdNTbR0BaC7HHj1inVWi0p7IuN
66EPGzJOSjLK+vW+J0ncPDEgLCV74RF/0nR5fVTdrmiopPrzFuguHf9S9gYI3Zun
Yl8FJUu4kRO6JPPTicUXWX+8XZmE94aK14RCJL23nOSi8T1eW8JLW43dCBRO8QUE
Aso1t2pypm/1zZexJdOV8yGME3g5l2W6PLgpz58DBECgqc/kda+VWgEAp7rO2A==
=EPL3
-----END PGP PUBLIC KEY BLOCK-----
[root@penguin /]# rpm -q --qf '%{NAME}\t%{SIGPGP:pgpsig}\n' rpm
rpm RSA/SHA256, Thu Jan 7 12:37:46 2021, Key ID 49fd77499570ff31
In the example above, the Version 9570ff31
matches the last 8 hex digits of the Key ID for the rpm
package (49fd7749
9570ff31
).
Fortunately, you can find your Origination ID in the Amazon Pinpoint console and delete it. You probably want to delete your SMS subscriptions first, because you may be assigned a new one as soon as SNS tries to send you another message. That should solve the "I don't want to pay for this" problem, but it doesn't solve the "so, now how do I get notified" problem.
One option is to use a Webhook for some other service you already get notifications from, like Amazon Chime, Google Chat, Microsoft Teams, or Slack (or Matrix, if you don't mind using a third-party bridge). Webhooks are simple API endpoints that use a token and other identifiers in the request URL, and accept some data (usually JSON) to do something - in this case to post a message to a channel or room.
SNS can't call a webhook directly, but you can write a Lambda function that will take an SNS event as input and call your Webhook with your SNS message content. Below is my own little attempt.
# Copyright Andrew Jorgensen
# SPDX-License-Identifier: MIT
"""Receive SNS events in Lambda and POST to a JSON Webhook.
Environment variables required:
* URL - The Webhook URL to POST to (including any required keys)
* TEMPLATE (default: {}) - The JSON data template to POST to the Webhook
* MESSAGE_KEY (default: text) - Key to set to the SNS Message
* TOPIC_KEY (optional) - Key to set to the Topic name from the SNS event
"""
import json
from os import environ
from urllib.request import urlopen, Request
CONTENT_TYPE = "application/json; charset=utf-8"
def lambda_handler(event, context):
"""Lambda handler - expects an SNS event"""
user_agent = context.function_name
print(json.dumps(dict(environ), sort_keys=True))
url = environ.get("URL")
template = environ.get("TEMPLATE", "{}")
message_key = environ.get("MESSAGE_KEY", "text")
topic_key = environ.get("TOPIC_KEY")
print(json.dumps(event, sort_keys=True))
topic = event["Records"][0]["Sns"]["TopicArn"].rsplit(":", 1)[1]
subject = event["Records"][0]["Sns"]["Subject"]
message = event["Records"][0]["Sns"]["Message"]
data = json.loads(template)
if topic_key:
data[topic_key] = topic
if subject:
data[message_key] = f"{subject}: {message}"
else:
data[message_key] = message
data = json.dumps(data, sort_keys=True)
print(data)
request = Request(
url=url,
data=data.encode("utf-8"),
headers={"User-Agent": user_agent, "Content-Type": CONTENT_TYPE},
)
with urlopen(request) as response:
print(response.read().decode("utf-8"))
Find current versions on GitHub
At a minimum it needs a URL environment variable with the Inbound Webhook URL you generated. All of Chat, Teams, Slack and Matrix (via t2bot.io) work with just the URL variable set. Amazon Chime requires that you also set MESSAGE_KEY
to Content
.
S3 buckets support TLS, but not with your domain name. If you want your own domain and TLS you need to put CloudFront, um, in front. Why bother with TLS for a static site? To get rid of the "⚠ Not secure" warning and to offer your visitors some privacy.
Certificate Manager certificates are free as long as they're only used on AWS services. You never get access to the private key, and you never worry about renewals.
You can also use Let's Encrypt with CloudFront, but there's literally no reason to, and I never finished writing a renewal Lambda function.
I like URLs that end in /
and not /index.html
. CloudFront will let you specify a default root object, but not deeper index pages. You can point CloudFront at an S3 website endpoint to get around this but there's no need to put a web server between CloudFront and S3 just to get clean URLs. S3 objects don't actually have folders (though the web console makes it look that way) so you can store an object at about/
(with the /
as part of the key).
Your filesystem can't do that though, so neither can your static site generator. My solution was to cobble together S3 and Lambda to copy anything named $prefix/index.html
to $prefix/
and have this function trigger on ObjectCreated
events in the site bucket when the suffix is /index.html
.
Here's the function I wrote for this, which I named Indice.
# Copyright Andrew Jorgensen
# SPDX-License-Identifier: MIT-0
import json
import boto3
INDEX = "index.html"
INDEX_LEN = len(INDEX)
CLIENT = boto3.client("s3")
def copy_index(record):
print(json.dumps(record))
region = record["awsRegion"]
bucket = record["s3"]["bucket"]["name"]
key = record["s3"]["object"]["key"]
index_key = key[:-INDEX_LEN] or "/"
CLIENT.copy(
CopySource={"Bucket": bucket, "Key": key},
Bucket=bucket,
Key=index_key,
ExtraArgs={"ACL": "public-read"},
)
def lambda_handler(event, context):
for record in event["Records"]:
copy_index(record)
Find current revisions of indice.py on GitHub.
This works great, and I'm charged almost nothing for it. I understand I'm at some risk of being popular enough that it costs me something but the chance that happens to me is pretty slim.
]]>Something was configured weird. I'd experimented with other smartcard certificates, hoping to get to where I could use SSH with generic smartcard support instead of using a gpg-agent
pretending to be an ssh-agent
. I must have messed up along the way.
This is supposed to be as easy as ykman openpgp reset
(from YubiKey Manager) and it probably is if you have a build of YubiKey Manager supports command-line usage. The AppImage build for Linux does not support this - even if you rob it of its DISPLAY
variable it just errors out because it can't find the display. I ended up using Windows to run ykman.exe openpgp reset
instead, though I worked out later that I could have installed yubikey-manager
on my Fedora system.
Along the way I hit other speedbumps. I thought I needed to reset it another way because ykman
wasn't going to work. I thought I needed the older ykpers
to work, but smartcard configuration hadn't been the only thing I messed with. Everyone who uses a YubiKey has been embarassed by typing the OTP into a chat window. I don't use the OTP feature so I disable it on my personal keys. But a older YubiKey tools won't talk to the NEO unless OTP is enabled, so I turned that back on using YubiKey Manager. Once it was on, other tools like ykinfo
would talk to it again but GPG couldn't talk to it anymore. This turned out to be a distraction anyway.
ykman openpgp reset
Obviously if you didn't export a backup of the private key you're out of luck. Your backup should be encrypted with a passphrase, so hopefully you kept that passphrase somewhere.
First you've got to add the private key to your GPG keyring.
gpg --import <backup>.asc
At this point you can follow the instructions at developers.yubico.com to move the key onto the YubiKey. This is where I had run into trouble when I tried before resetting.
]]>Portable HDDs were a necessary step in portable data storage evolution, and they're still around half the cost per-GB, but storing all your data eggs in one aluminium basket spinning at 7,200 RPM is not a great idea, at least not on its own.
The simplest way to keep your data safe is redundancy - just keep more than one copy of your data. At a minimum manually copy things you care about from one computer to another sometimes, or keep a copy on your computer and use an external drive only as a backup in case you accidentally delete something. Paying for some kind of cloud storage might be an even better idea if you can afford a subscription.
My friend's drive was damaged in a way that made Windows take one look at it and say "I'm not touching that." That's an extreme position to take. Linux on the other hand was happy to try.
Important! Only mount damaged filesystems read-only! The filesystem driver may choose to do strange things when it encounters errors. Your best chance for recovery requires leaving the bits just as they are.
If you are going to use Windows to do recovery I've had some success with EaseUS. It's not Free, but neither is Windows, and professional recovery is expensive (for good reasons).
ntfsclone
If the damage is not too extensive and the filesystem is in a state that will allow it, ntfsclone
(part of NTFS-3G / ntfsprogs) will copy only the blocks that are still relevant to the filesystem. This will save you a ton of time compared to reading every block on the drive.
Unfortunately I tried other things first this time and got the filesystem into a state where ntfsclone
refused to try. Or maybe the damage was too extensive. In any case it didn't work this time, but the last time I had to do this it was extremely helpful.
ddrescue
Depending on the size of the drive and how many damaged sectors there are this could take a long time - on the order of days or weeks - but it's worth it. GNU ddrescue reads data off the damaged drive, at first skipping the bad blocks, but later going back to retry them, try them in smaller chunks, try them forwards and backwards, etc., all the while keeping track of which blocks have been successfully copied.
# ddrescue --sparse --idirect /dev/sda recovery.{img,map}
GNU ddrescue 1.25
Press Ctrl-C to interrupt
Initial status (read from mapfile)
rescued: 1000 GB, tried: 60336 kB, bad-sector: 21972 kB, bad areas: 8656
Current status
ipos: 105688 MB, non-trimmed: 0 B, current rate: 0 B/s
opos: 105688 MB, non-scraped: 38351 kB, average rate: 0 B/s
non-tried: 0 B, bad-sector: 21985 kB, error rate: 0 B/s
rescued: 1000 GB, bad areas: 8656, run time: 2m 21s
pct rescued: 99.99%, read errors: 25, remaining time: n/a
time since last successful read: n/a
Scraping failed blocks... (forwards)
Size is a problem, but not as big a problem as you'd think. My friend's 1TB HDD had about 130GB of data on it, and using the --sparse
option meant that the total size of the image file I copied their drive to was only 150GB (this includes leftover data from deleted files, and filesystem metadata, but doesn't include the damaged portions).
$ du --human-readable --apparent-size recovery.img
932G recovery.img
$ du --human-readable recovery.img
149G recovery.img
Speed is also a problem. The NTFS driver on Linux is extremely CPU hungry (or was on the Fedora 32 system I was using). I got the best performance by using an intermediate drive (instead of the replacement 1TB drive my friend also provided) using an EXT4 filesystem. Reading bad blocks also takes longer than reading good blocks because various layers between you and the tiny magnetic fields storing the data will retry. Using the --idirect
option helped it register the errors quickly and move on, though it moved slower while reading good blocks.
losetup
Once you have an image of the drive that has a much data as you can sit around waiting for ddrescue to recover you'll need to mount it (again read-only) so that you can pull the files off it. You can do this using loopback devices (losetup
).
# losetup --find --read-only --partscan --show recovery.img
/dev/loop0
# ls /dev/loop0*
/dev/loop0 /dev/loop0p1
# mount -o ro /dev/loop0p1 /mnt/
rsync
Now that you've got a mounted filesystem that won't block waiting for a damaged drive to try to read bad sectors, the only step remaining is to copy what you can to the new drive. rsync
is the obvious choice. One important reason for that is that if your copy gets interrupted rsync can almost pick up where it left off (it will check metadata for changes before it gets going again). I keep it simple by using the --archive
option.
Here are some things I tried that I wish I hadn't, but were interesting in some way.
I was worried I wouldn't have enough space on my intermediate drive to store the full image file. One reason I worried about this is that it's possible for a drive to not be full of null
bytes wherever there's empty space. null
bytes can be stored as sparse blocks on modern filesystems but there's no guarantee that your drive isn't instead full of random data or that every unused bit is a 1
instead of a 0
. It turns out that the HDD I was recovering was initialized to 0
s, so I shouldn't have worried. It's possible the drive had a lot of files deleted from it so that the recovery would include a lot of old deleted data. None of this was the case, and none of it was likely. All of it lead me to try some dumb things. In the end I had enough space and I lost a lot of time.
Sometimes pronounced butterfs or even betterfs but apparently standing for "b-tree filesystem", Btrfs supports on-the-fly compression, so I thought maybe it would be a good idea to use that to avoid outgrowing my intermediate disk. It didn't help much (if at all) and it made everything take a lot longer.
The QEMU Copy-on-Write 2 disk image format also supports compression. QEMU includes the qemu-nbd
utility that can be used to let you connect a QEMU-supported image to a running Linux system using the nbd (network block device) driver. This also made everything slow enough I didn't have the patience for it.
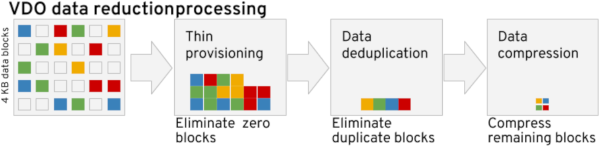
Not one to be daunted by other failed attempts I also tried a compression and deduplication system called Virtual Data Optimizer. This is an officially supported feature of Red Hat Enterprise Linux, so I thought "hey, this'll be great!" And it really is great in theory. I'll probably use it for something else some day. But again, way too slow to be a good idea.
If I had this to do over again, I'd avoid ever touching the damaged drive with something that might try to write to it, I'd copy the whole thing using ddrescue
, and I'd depend on the Linux NTFS-3G drivers to just do their best at getting recovered files off the recovered volume. I'd avoid any false starts and just accept that it's going to take a very long time.
If you're recovering deleted files, or deleted partitions, TestDisk is supposed to be able to do some great things for you. I haven't used it in a long time, but It's worth keeping in your recovery toolbox.
]]>Google has a service where you can look up the current versions of Chrome OS for all supported devices at https://cros-omahaproxy.appspot.com. This service takes a long time (about 25s) to respond, presumably because it's pulling data every time you hit it without any caching. But whatever, it works and yields accurate data.
You can get the raw data as a CSV file from https://cros-omahaproxy.appspot.com/all. I tried to get it to yield less data by some other URL but couldn't find anything. If you find a way, please let me know!
I've been using an AWS Lambda function using this method for more than a year, but there's a better way.
The better way is to query Google's update service directly, the same way your Chromebook does. Getting the right data from your Chromebook is a bit trickier, but the latency is a lot better. To discover how your chromebook is polling for updates, have a look at file:///var/log/update_engine.log
where you'll see something like this buried in there:
[1109/122036.268126:INFO:action_processor.cc(51)] ActionProcessor: starting OmahaRequestAction
[1109/122036.270252:INFO:omaha_request_action.cc(444)] Posting an Omaha request to https://tools.google.com/service/update2
[1109/122036.270303:INFO:omaha_request_action.cc(445)] Request: <?xml version="1.0" encoding="UTF-8"?>
<request requestid="33041542-1d01-475b-84fd-ccb6e8e4e3cb" sessionid="deea5477-4296-41ed-b627-2dd1063d311a" protocol="3.0" updater="ChromeOSUpdateEngine" updaterversion="0.1.0.0" installsource="scheduler" ismachine="1">
<os version="Indy" platform="Chrome OS" sp="12499.51.0_x86_64"></os>
<app appid="{BD7F7139-CC18-49C1-A847-33F155CCBCA8}" cohort="1:c/1f:" cohortname="nocturne_stable_canaryrelease_12499.51.0" version="12499.51.0" track="stable-channel" lang="en-US" board="nocturne-signed-mpkeys" hardware_class="NOCTURNE D5B-A5F-B47-H6A-A5L" delta_okay="true" fw_version="" ec_version="" installdate="4683" >
<updatecheck></updatecheck>
</app>
</request>
[1109/122036.273080:INFO:libcurl_http_fetcher.cc(141)] Starting/Resuming transfer
[1109/122036.279691:INFO:libcurl_http_fetcher.cc(160)] Using proxy: no
[1109/122036.280139:INFO:libcurl_http_fetcher.cc(300)] Setting up curl options for HTTPS
[1109/122036.409431:INFO:metrics_reporter_omaha.cc(550)] Uploading 0 for metric UpdateEngine.CertificateCheck.UpdateCheck
[1109/122036.410456:INFO:metrics_reporter_omaha.cc(550)] Uploading 0 for metric UpdateEngine.CertificateCheck.UpdateCheck
[1109/122036.411256:INFO:metrics_reporter_omaha.cc(550)] Uploading 0 for metric UpdateEngine.CertificateCheck.UpdateCheck
[1109/122036.497188:INFO:libcurl_http_fetcher.cc(471)] HTTP response code: 200
[1109/122036.497724:INFO:libcurl_http_fetcher.cc(578)] Transfer completed (200), 566 bytes downloaded
[1109/122036.497789:INFO:omaha_request_action.cc(840)] Omaha request response: <?xml version="1.0" encoding="UTF-8"?><response protocol="3.0" server="prod"><daystart elapsed_days="4695" elapsed_seconds="44437"/><app appid="{BD7F7139-CC18-49C1-A847-33F155CCBCA8}" cohort="1:c/1f:" cohortname="nocturne_stable_canaryrelease_12499.51.0" status="ok"><updatecheck _firmware_version_0="1.1" _firmware_version_1="1.1" _firmware_version_2="1.1" _firmware_version_3="1.1" _firmware_version_4="1.1" _kernel_version_0="1.1" _kernel_version_1="1.1" _kernel_version_2="1.1" _kernel_version_3="1.1" _kernel_version_4="1.1" status="noupdate"/></app></response>
Trial and error allowed me to work out a smaller, more generic request body that will probably work for a few years yet until backwards compatibility is dropped:
<?xml version="1.0" encoding="UTF-8"?>
<request protocol="3.0" ismachine="1">
<app appid="{BD7F7139-CC18-49C1-A847-33F155CCBCA8}" track="stable-channel" board="nocturne-signed-mpkeys" hardware_class="NOCTURNE D5B-A5F-B47-H6A-A5L" delta_okay="false">
<updatecheck/>
</app>
</request>
Parameters for your Chromebook can be obtained by going to chrome://system
on your device.
Attribute | chrome://system Value |
---|---|
appid |
CHROMEOS_RELEASE_APPID |
track |
CHROMEOS_RELEASE_TRACK |
board |
CHROMEOS_RELEASE_BOARD |
hardware_class |
HWID |
POST
ing this query to https://tools.google.com/service/update2
yields a response like this:
<?xml version="1.0" encoding="UTF-8"?>
<response protocol="3.0" server="prod">
<daystart elapsed_days="4696" elapsed_seconds="30722"/>
<app appid="{BD7F7139-CC18-49C1-A847-33F155CCBCA8}" cohort="1:c/1f:" cohortname="nocturne_stable_canaryrelease_12499.51.0" status="ok">
<updatecheck _firmware_version="1.1" _firmware_version_0="1.1" _firmware_version_1="1.1" _firmware_version_2="1.1" _firmware_version_3="1.1" _firmware_version_4="1.1" _kernel_version="1.1" _kernel_version_0="1.1" _kernel_version_1="1.1" _kernel_version_2="1.1" _kernel_version_3="1.1" _kernel_version_4="1.1" status="ok">
<urls>
<url codebase="http://dl.google.com/chromeos/nocturne/12499.51.0/stable-channel/"/>
<url codebase="https://dl.google.com/chromeos/nocturne/12499.51.0/stable-channel/"/>
</urls>
<manifest version="12499.51.0">
<actions>
<action event="install" run="chromeos_12499.51.0_nocturne_stable-channel_full_mp.bin-e52a7b4317aacd1689bc610656a9bcfb.signed"/>
<action ChromeOSVersion="12499.51.0" ChromeVersion="78.0.3904.92" IsDeltaPayload="false" MaxDaysToScatter="14" MetadataSignatureRsa="okC/hvhqmQnerQ33y4AWPYFI6yGLHKIPOmzKzb/ri4odvKEmr1KKMWvgXLxzTFTorBpl2I/Wrx634E61cMQSssQKPUQ9hAFXdSorIuO60kEgGZivQVMR4kktETka84SCuORgOzum9VN27V9MQyG3+CIS+C1BflPPGXPd6zw35FTh4LI4HkX6cIy6kTldxZt9V7XywEdLuZpQZmC2PI3kr1Nf9B+scgTwdHaoq9g2hCmbsxq+ivPKVjfVRrWNwVUVnERJs5WfK+27qmuf6a8piC2wl3ApyqzYda4iY/QLsWTuROYVNbf7YWKrPQF1QpzeWLmgDtuAThS0oLkFuGZwNw==" MetadataSize="65824" event="postinstall" sha256="MSAexfVkSoPRVl3sGQJGlY4Gl6pJRoXDXy1+BsHNpdg="/>
</actions>
<packages>
<package fp="1.31201ec5f5644a83d1565dec190246958e0697aa494685c35f2d7e06c1cda5d8" hash_sha256="31201ec5f5644a83d1565dec190246958e0697aa494685c35f2d7e06c1cda5d8" name="chromeos_12499.51.0_nocturne_stable-channel_full_mp.bin-e52a7b4317aacd1689bc610656a9bcfb.signed" required="true" size="1133479208"/>
</packages>
</manifest>
</updatecheck>
</app>
</response>
The piece we're interested in is ChromeVersion
from this action
element:
<action ChromeOSVersion="12499.51.0" ChromeVersion="78.0.3904.92" IsDeltaPayload="false" MaxDaysToScatter="14" MetadataSignatureRsa="okC/hvhqmQnerQ33y4AWPYFI6yGLHKIPOmzKzb/ri4odvKEmr1KKMWvgXLxzTFTorBpl2I/Wrx634E61cMQSssQKPUQ9hAFXdSorIuO60kEgGZivQVMR4kktETka84SCuORgOzum9VN27V9MQyG3+CIS+C1BflPPGXPd6zw35FTh4LI4HkX6cIy6kTldxZt9V7XywEdLuZpQZmC2PI3kr1Nf9B+scgTwdHaoq9g2hCmbsxq+ivPKVjfVRrWNwVUVnERJs5WfK+27qmuf6a8piC2wl3ApyqzYda4iY/QLsWTuROYVNbf7YWKrPQF1QpzeWLmgDtuAThS0oLkFuGZwNw==" MetadataSize="65824" event="postinstall" sha256="MSAexfVkSoPRVl3sGQJGlY4Gl6pJRoXDXy1+BsHNpdg="/>
Note that there's a separate ChromeOSVersion
but that value is not the one you're familiar with, so we'll ignore it.
We can get at that element with the XPath query .//action[@ChromeVersion]
. A fairly minimal Python script to fetch the current version for a Chromebook looks like this:
#!/usr/bin/env python3
# Copyright (c) Andrew Jorgensen. All rights reserved.
# SPDX-License-Identifier: MIT-0
from urllib.request import urlopen
from xml.etree import ElementTree
AUSERVER = "https://tools.google.com/service/update2"
REQUEST = """<?xml version="1.0" encoding="UTF-8"?>
<request protocol="3.0" ismachine="1">
<app appid="{appid}" track="{track}" board="{board}" hardware_class="{hardware_class}" delta_okay="false">
<updatecheck/>
</app>
</request>"""
VERSION_ATTRIB = "ChromeVersion"
VERSION_XPATH = ".//action[@{}]".format(VERSION_ATTRIB)
def chrome_version(appid, track, board, hardware_class):
"""Get the Chrome version for a Chromebook"""
request = REQUEST.format(
appid=appid, track=track, board=board, hardware_class=hardware_class
).encode()
with urlopen(AUSERVER, data=request) as response:
root = ElementTree.parse(response).getroot()
for action in root.findall(VERSION_XPATH):
return action.attrib[VERSION_ATTRIB]
if __name__ == "__main__":
from sys import argv
print(chrome_version(*argv[1:]))
To actually get notified when one of my Chromebooks gets an update, I've create an AWS Lambda function that queries the update service and stores the result in DynamoDB. The function is triggered by a CloudWatch Events scheduled event. When the queried version differs from the stored version, it posts a message to an SNS topic. Since I've subscribed my phone to that SNS topic, I get a text message when the update service gives a new response.
The code for this is in GitHub as it's more than I want to include in a blog post, and I may improve it over time.
]]>Family WiFi site blocking works by overriding DNS responses. This is one of the most common ways to filter the Internet and it has the potential of being very effective. To contact a website your browser must first ask the Domain Name System which host on the Internet to contact. In your home that query normally goes to a caching DNS service running on your router. That service in turn queries a DNS service hosted by your ISP or some public DNS service. Ultimately these queries are answered by some authoritative source controlled by the owner of the domain.
Site blocking on Google WiFi happens at the caching DNS service on running on your Primary WiFi point. When a query comes in it's checks against Google's content categorization database. If the website is in the explicit category a false response is returned instead of the actual response. This is why when a secure website is blocked you get a security warning instead of a friendly page telling you you've been blocked. In that case your browser is trying to talk to the site it asked for but it's getting a response from some other host.
There are a few easy ways to bypass Family WiFi site blocking. Ironically the most effective means to get explicit content while "protected" by site blocking are provided by Google.
Most devices allow you to choose which DNS servers you use, instead of using the ones provided by the network. Changing your DNS to Google Public DNS at 8.8.8.8 and 8.8.4.4 will completely bypass site blocking. It will also get you around OpenDNS and other similar systems you might be using unless other steps are taken.
On recent Android devices you can also use Google Private DNS at dns.google. More on that later.
Family WiFi site blocking does nothing to prevent you searching for explicit content on Google or YouTube. Even when a site you might go to is blocked you can usually see images and sometimes video right there in the search results.
To be fair, Google is made of people and many of those people probably do care about our kids. But good business decisions aren't about what employees care about. In a publicly held company most business decisions must be made based on the impact to shareholder value. My hope is that in some small way this post will change the equation so that the good googlers who do care about our kids will be empowered to do something about it. Enough fairness. Here are my suggestions.
Google allows organizations to enforce SafeSearch at the network level. I have a Circle device that does exactly this. It's done the same way the rest of this stuff is, by overriding a DNS response so that all your searches go to Google's SafeSearch servers instead. That Google WiFi doesn't already do this is completely mind blowing. This should have been the bare minimum they would do.
YouTube also has a way to enforce Restricted Mode, again by overriding some DNS responses. Again, it's mind blowing that Google WiFi doesn't already do this. Unfortunately YouTube has a hard time categorizing its content. They haven't even been able to keep videos with suicide instructions off of YouTube Kids. And there are a lot of perfectly safe videos that have been incorrectly flagged as explicit.
The ASUS router I used to use let me block DNS so that only queries destined for the router's own caching service, and queries originating at the router, could reach the Internet. When my kids configured their Chromebooks to use Google Public DNS instead of the router, DNS just stopped working. You can't do that yet with Google WiFi.
There are some newer ways to do DNS and they can be tricky to block. DNS-over-TLS and DNS-over-HTTPS both provide end-to-end encryption from the client device to the DNS service.
Google has its own DNS-over-TLS service and it's easy to configure an Android phone or tablet to use it. DNS-over-TLS runs over port 853 so blocking just that port would mostly plug that hole.
Google and Cloudflare both also offer DNS-over-HTTPS. This one is harder to block because it runs on port 443 where most of the web lives, but Cloudflare's is at 1.1.1.1 so it's easy to block that address and Google knows where theirs is. Keeping up with others is a cat and mouse game, but that's exactly what content categorization is about.
As if Google hasn't already done enough to make it easy to bypass their own Family WiFi site blocking, they've also got a Data Saver feature in Chrome that should let you waltz around site blocking. It's been only marginally useful up to now because it only supported insecure HTTP websites, but they recently added HTTPS support. Most Internet filtering devices will block proxy and VPN services like Data Saver if configured to do so.
Finally they could deny access to anything that hasn't been successfully categorized as not explicit. There's a lot of content out there and even Google can't categorize it all. But most of what people actually use is well known and Google could assume that if it's unknown it's not safe for kids.
]]>Most of the settings in MATE (and in GNOME) are stored using GSettings. dconf is the database backend behind GSettings. You can think of it as something roughly equivalent to the Windows Registry. There are two ways of configuring system defaults, one for privileged users and systems administrators and one for vendors, distributors, and packagers.
The dconf System Administrator Guide describes a bit about how to use dconf to set local defaults and mandatory settings if you're a systems administrator. This is the process you'd follow if you use a configuration management system like Ansible. Note that dconf itself doesn't process any schema, so it's easy to make mistakes that could cause software to misbehave. The GNOME documentation recommends using dconf over GSettings overrides because /usr
may be read-only on some systems. dconf can also allow you to lock specific settings.
For vendors and distributors the GIO Reference Manual recommends using vendor override files to effectively patch existing schema.
Before making any changes to your desktop, capture a dump of all settings as they are by default already.
gsettings list-recursively | sort > gsettings.before
After making your changes, for example changing the wallpaper, capture another dump of the settings and compare them.
gsettings list-recursively | sort > gsettings.after
diff -U0 gsettings.{before,after}
--- gsettings.before 2018-12-07 12:14:34.052711800 -0800
+++ gsettings.after 2018-12-07 12:16:27.017519406 -0800
@@ -1117 +1117 @@
-org.mate.background picture-filename '/usr/share/backgrounds/amazon/workspaces-wireframe.svg'
+org.mate.background picture-filename '/usr/share/backgrounds/amazon/Amazon-WorkSpaces-4.jpeg'
In this example there are no additional differences than the one I want, but there may be if you've been clicking around much. Or you might have several changes you want to use.
If you are a user or an administrator, it's recommended that you use dconf overrides to configure your system defaults.
Local dconf overrides are stored under /etc/dconf/db/local.d/
in a format similar to (but not quite) .ini
. Group names in the file refer to the schema path, not the schema id. You can get the schema path from the .gschema.xml
file.
grep -F path= /usr/share/glib-2.0/schemas/org.mate.background.gschema.xml
<schema id="org.mate.background" path="/org/mate/desktop/background/">
In the above example org.mate.background
has a schema path of /org/mate/desktop/background/
so you'd use org/mate/desktop/background
as the group name.
[org/mate/desktop/background]
picture-filename='/usr/share/backgrounds/amazon/Amazon-WorkSpaces-4.jpeg'
After you've placed a file like the above under /etc/dconf/db/local.d/
you need to also update the dconf database. This will cause it to process any overrides and save them into the binary database format it uses.
dconf update
If you are a vendor or distributor, or if you are putting the override in an installable package, it's recommended that you use GSettings schema overrides.
GSettings schema and overrides are stored under /usr/share/glib-2.0/schemas/
in effectively the same format as dconf overrides, but using the dotted schema id as the group name instead of the schema path as in a dconf override. Schema override files end in .gschema.override
[org.mate.background]
picture-filename='/usr/share/backgrounds/amazon/Amazon-WorkSpaces-4.jpeg'
Schema overrides are processed in sort order, so it's common to use a two digit number to set the priority of your override compared to others. For example you might create an override file called 50_desktop-background.gschema.override
. For the override to take effect you must compile them with glib-compile-schemas /usr/share/glib-2.0/schemas
.
In RPM packages schema are compiled in %posttrans
and %postun
scriptlets. This is not needed on recent Fedora systems because file triggers take care of it, but it is still needed on RHEL 7, CentOS 7, and Amazon Linux 2. The %postun
scriptlet is needed because %posttrans
is not run for packages that have been uninstalled.
%postun
if [[ "$1" -eq 0 ]]; then
/usr/bin/glib-compile-schemas /usr/share/glib-2.0/schemas &> /dev/null ||:
fi
%posttrans
/usr/bin/glib-compile-schemas /usr/share/glib-2.0/schemas &> /dev/null ||:
You'll want to see what everything looks like once you're done, to make sure it worked, so it's useful to reset all your local settings back to the newly configured system defaults in your own session. Most software will reconfigure immediately, but some could require you to logout first.
dconf reset -f /
Securly is a content filtering service used extensively in the education sector. They have a Chrome extension the school enforces on student Chromebooks to block a wide variety of sites including time-wasters like slither.io. It has, I assume, a great reputation among school administrators and a long history of flaws exploited by persistent students.
Back in February 2017 I reported a trivial exploit to our School District, who reported it to Securly and included me in the support ticket. Of course they harassed my son about it, but we got that cleared up. Securly requested a phone call to discuss the issue in April 2017 but I must have been too busy for a call at the time. I sent them detailed instructions and live examples in June 2017. In April 2018 they got back to me with a note that they would get back to me again when they had an update from the developers. It's now November 2018. School is in session again. It's time to publish.
The exploit is super simple, and school districts all over the world are going to try a lot of stupid things like banning text editors to block it. Sorry about that, kids. And granted, this is very likely not Securly's fault. Far more likely Google doesn't give them enough control to allow them to plug this hole, for reasons that will be obvious to anyone who knows how Google makes money.
So here goes. If you're on a device restricted by Securly, head on over to http://s3-us-west-2.amazonaws.com/insecurly/iframe.html
and type an http://
URL of a blocked site into the box at the top. Some sites will redirect to https://
, as they certainly should, and so those won't work so well. For many of those, go to https://s3-us-west-2.amazonaws.com/insecurly/iframe.html instead. Most social media sites won't work, but a lot of time wasters will, and there are probably ways to improve the exploit so that some of the social media sites will to. Please comment if you know how.
What's going on? Securly can't block the contents of iframes. An iframe is a box on a website that contains another website. They're used extensively for ads, and they were very cool back in the 90s. You don't even have to host it on a server, if the site you're looking for doesn't require HTTPS. You can type it up in a text editor, save it to disk, and point your browser at it.
<!DOCTYPE html>
<html lang="en">
<head>
<title>insecurly</title>
<script type="text/javascript">
function load(element) {
if (event.keyCode == 13) {
document.getElementById('iframe').src = element.value;
}
}
</script>
</head>
<body>
<div>
<input type="text" size="60" onkeydown="load(this)"/>
</div>
<iframe id="iframe" src="about:blank" style="width:100%; height:600px;"></iframe>
</body>
</html>
As a parent, I will be happier when Securly takes this seriously and finds a way to fix it, though I have a hunch the kids will always be one step ahead of them. Just the other day my younger son told me that they can also defeat Securly by loading 50 instances of the page they want at once (haven't tried it yet, but I'm sure it sometimes works). But Securly consistently failed to address the issue for more than a year, and I told them I intended to publish back in June 2017, so I finally got around to it.
]]>